
PostgreSQL high availability using Pgpool-II
In the BI environment, it is a challenge to update the data while providing consistent reporting. This article describes a solution for a system based on PostgreSQL infrastructure.
Introduction
The requirement was to update individual nodes of the cluster and still have consistent reporting available. After some research, Pgpool-II was identified to be a good candidate to fulfill this requirement. Pgpool-II is an open-source proxy sitting between PostgreSQL client applications and PostgreSQL servers. It provides many features; among other things, load balancing, connection pooling, automated fail over and watchdog.
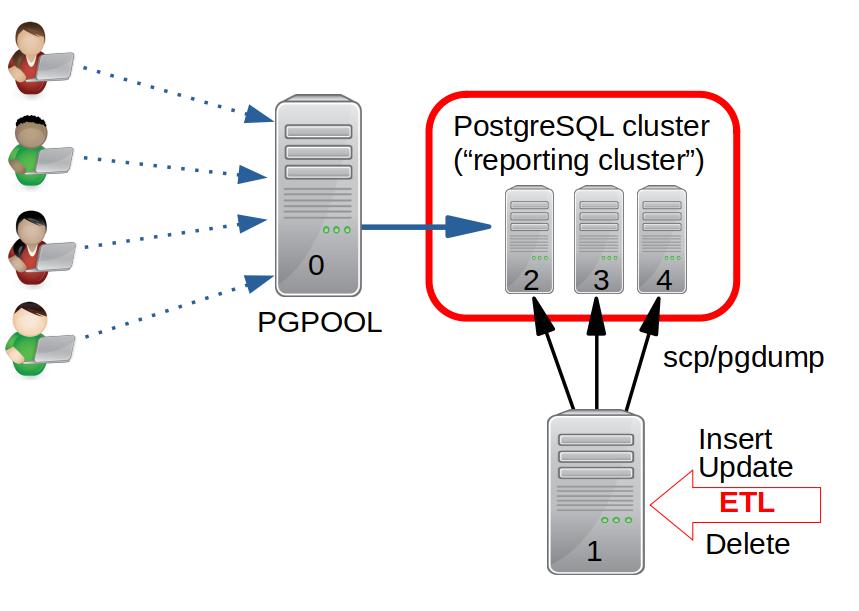
The goal was to verify the technical feasibility of using Pgpool-II for load balancing and to manage the availability of the cluster nodes. In the selected scenario (see Fig. 1), an ETL process will be executed on an additional PostgreSQL server (host_1), which is not part of the Pgpool-II managed cluster. After the refresh job has finished successfully on host_1, the updated data will be copied to the “reporting cluster”, consisting of three PostgreSQL instances (host_2, host_3, host_4). The end user interfaces are configured to connect the Pgpool-II as proxy (host_0).
This post describes the configuration of a PostgreSQL high availability cluster environment using Pgpool-II for load balancing, and further describes the update process of the “reporting cluster”. Ubuntu 18.04.3 LTS was installed on all hosts. All instances use PostgreSQL version 10.10 and are configured to listen on the default port 5432. The Pgpool-II package is not included in the Ubuntu 18.04 repositories. The source code can be downloaded here and compiled as described in the installation documentation. The Pgpool-II version used was 4.1.0.
Configuration of Pgpool-II
All described steps will be executed as root (sudo -s) on host_0.
After the installation of Pgpool-II, go to folder /usr/local/etc/ and create the files pgpool.conf and pcp.conf as a copy of the <file>.conf.sample file.
Additionally, the directory /var/log/pgpool was created.
The modifications to the file /usr/local/etc/pgpool.conf are:
| value | default | new |
|---|---|---|
| listen_addresses | localhost | * |
| port | 9999 | <every_free_port_you_like> |
| sr_check_user | nobody | <db_user> |
| sr_check_password | “ | <password_of_db_user> |
| pid_file_name | ‘/var/run/pgpool/pgpool.pid’ | ‘/tmp/pgpool.pid’ |
| logdir | ‘/tmp’ | ‘/var/log/pgpool’ |
| load_balance_mode | ‘off’ | ‘on’ |
| replication_mode | ‘off’ | ‘on’ |
At the end of the file, add a section for each PostgreSQL instance:
backend_hostname<?> = '<ip_address_or_DNS_name_of_PostgreSQL_node'
backend_port<?> = 5432
backend_weight<?> = 1
backend_data_directory<?> = '/var/lib/postgresql/10/main'
backend_flag<?> = 'ALLOW_TO_FAILOVER'
The placeholder <?> represents an integer sequence starting from 0.
The integer is equal to the cluster node id used by Pgpool-II.
The execution on command line of the command
pg_md5 -m -u <db_user> -f /usr/local/etc/pgpool.conf -p
prompts for the password of <db_user> and adds the following line into /usr/local/etc/pool_passwd:
<db_user>:md5<md5_hash_of_db_user_password>
Pgpool-II now can be started via command line with
pgpool -n
and stopped:
pgpool -m fast stop
Configuration to execute pcp commands
To execute the pcp commands with the shell, the file /usr/local/etc/pcp.conf has to be modified too.
The following command
pg_md5 -p
will prompt for the password of the <db_user> and return the md5 hash.
Add the following line into/usr/local/etc/pcp.conf:
<db_user>:<md5_hash_of_passwort_of_db_user>
If the execution of pcp commands raises the error message
error while loading shared libraries: libpcp.so.1: cannot open shared object file: No such file or directory
create a new file /etc/ld.so.conf.d/pgpool-II.conf and add the line
/usr/local/lib
Then reload the dynamic link cache with
ldconfig
Set up Pgpool-II as a daemon
Create the file /lib/systemd/system/pgpool2.service as follows:
[Unit]
Description=pgpool-II
Requires=pgpool2-helper.service

[Service]
ExecStart=/usr/local/bin/pgpool -n
ExecReload=/bin/kill -HUP $MAINPID
KillSignal=SIGINT
StandardOutput=syslog
SyslogFacility=local0

[Install]
WantedBy=multi-user.target
Create the file /lib/systemd/system/pgpool2-helper.service and insert
[Unit]
Description=Helper service for pgpool-II to create /var/run/pgpool
After=network.target
Before=pgpool2.service

[Service]
ExecStart=/bin/mkdir /var/run/pgpool
ExecReload=/bin/kill -HUP $MAINPID
KillSignal=SIGINT
StandardOutput=syslog
SyslogFacility=local0

[Install]
WantedBy=multi-user.target
Afterwards, create the symbolic links:
ln -s /lib/systemd/system/pgpool2.service /etc/systemd/system/pgpool2.service
ln -s /lib/systemd/system/pgpool2-helper.service /etc/systemd/system/pgpool2-helper.service
and reload systemd
systemctl daemon-reload
To start the Pgpool-II daemon automatically during server startup, execute
systemctl enable pgpool2-helper.service
systemctl enable pgpool2.service
To start the Pgpool-II daemon manually, execute
systemctl start pgpool2-helper.service
systemctl start pgpool2.service
Now modify file /usr/local/etc/pgpool.conf and restart Pgpool-II
| value | default | new |
|---|---|---|
| pid_file_name | ‘/tmp/pgpool.pid’ | ‘/var/run/pgpool/pgpool.pid’ |
| socket_dir | ‘/tmp’ | ‘/var/run/pgpool’ |
| pcp_socket_dir | ‘/tmp’ | ‘/var/run/pgpool’ |
Test load balancing
Before the load balancing test can be started on all PostgreSQL instances, the following line has to be added to the file /etc/postgresql/10/main/pg_hba.conf, and the instances restarted.
host all <dbuser> <host_name_of_pgpool> md5
The tool pgbench can be used to test the configuration and the load balancing. First initialize the PostgreSQL databases by executing the following command on each PostgreSQL instance:
pg_bench -i -h <PostgreSQL_host> -p <port> -U <db_user> <database>
Log into the PostgreSQL and check the current status of the pool nodes:
psql -h <host_of_pgpool> -p <port_pgpool_is_listen> -U <db_user> -d <database>
    <database>=# show pool_nodes;
Before starting the load balance test, the output is:
| node_id | hostname | port | status | select_cnt |
|---|---|---|---|---|
| 0 | host_2 | 5432 | up | 0 |
| 1 | host_3 | 5432 | up | 0 |
| 2 | host_4 | 5432 | up | 0 |
Keep in mind, the column node_id represents the value <?> of variable backend_hostname<?> in file /usr/local/etc/pgpool.conf (see above).
To test the load balancing, execute on a PostgreSQL node:
pgbench -h <host_of_pgpool> -p <port_pgpool_is_listen> -c 10 -j 10 -S -T60 -U <db_user> <database>
In this example, 10 clients (-c) executes select-only transactions (-S).
To check the load balancing execute the show pool_nodes; command again. The output looks like:
| node_id | hostname | port | status | select_cnt |
|---|---|---|---|---|
| 0 | host_2 | 5432 | up | 212090 |
| 1 | host_3 | 5432 | up | 126605 |
| 2 | host_4 | 5432 | up | 84033 |
To verify database connections exists, you can also execute
ps aux | grep pgpool
The output looks like the following table:
| USER | PID | %CPU | %MEM | VSZ | RSS | TTY | STAT | START | TIME | COMMAND |
|---|---|---|---|---|---|---|---|---|---|---|
| root | 6292 | 0.0 | 0.1 | 622672 | 4356 | ? | S | 10:13 | 0:00 | pgpool: <db_user> <database> host_3(51270) idle |
| root | 6295 | 0.0 | 0.1 | 622672 | 4356 | ? | S | 10:13 | 0:00 | pgpool: <db_user> <database> host_2(51270) idle |
| root | 6298 | 0.0 | 0.1 | 622672 | 4356 | ? | S | 10:13 | 0:00 | pgpool: <db_user> <database> host_4(51270) idle |
| root | 6308 | 0.0 | 0.0 | 622672 | 4356 | ? | S | 10:13 | 0:00 | pgpool: wait for connection request |
| root | 6309 | 0.0 | 0.0 | 622672 | 4356 | ? | S | 10:13 | 0:00 | pgpool: wait for connection request |
| root | 6310 | 0.0 | 0.0 | 622672 | 4356 | ? | S | 10:13 | 0:00 | pgpool: wait for connection request |
| root | 6311 | 0.0 | 0.0 | 622672 | 4356 | ? | S | 10:13 | 0:00 | pgpool: wait for connection request |
| root | 6312 | 0.2 | 0.3 | 231676 | 5126 | ? | S | 10:13 | 0:06 | pgpool: <db_user> <database> host_4(51270) SELECT |
| root | 6313 | 0.2 | 0.3 | 231676 | 5126 | ? | S | 10:13 | 0:05 | pgpool: <db_user> <database> host_4(51270) SELECT |
The idle sessions are connected (PIDs 6308, 6309, 6310, 6311) and the SELECT (PIDs 6312, 6313) is an active session.
Description of the refresh process
This section describes the implementation of the database node refresh process. To keep a long story short, not all steps are fully explained. This section should only give an impression of how this process was implemented.

The communication of the different servers will be done via SSH.
Therefore, SSH keys must be generated (ssh-keygen) and the public must to be copied to the PostgreSQL servers (ssh-copy-id) host_1, host_2, host_3 and host_4.
To simplify the communication, create file ~/.ssh/config on host_0.
For each PostgreSQL node add the following entries:
host <alias_that_can_used_in_bash_scripts>
hostname <ip_address_or_DNS_name_of_the_PostgreSQL_instance>
user <name_of_OS_user_in_which_context_the_scripts_will_be_executed>
IdentityFile <path_to_the_id_rsa_file>
A valid entry could look like:
host node0
hostname host_2
user bob
IdentityFile ~/.ssh/id_rsa
The value of the variable host was set to "node<node_id>" where <node_id> represents the Pgpool-II cluster node number (see output of command show pool_nodes;) and is reflected in the configuration of file /usr/local/etc/pgpool.conf as (backend_hostname<?>).
On host_0, the master Bash script manage_pgpool.sh is stored.
The purpose of this script is to manage the refresh of the "reporting cluster”.
In the first step, the Bash script export_PG.sh will be started on host_1, in order to export the data using pg_dump.
The folder of the latest dump will be written to the file .outfile.
This file will be read by the master script.
To get the folder, where the latest dump is stored, the script reads the .outfile by executing the following command:
dumpfolder=$(ssh etl_server cat .outfile)
# content of .outfile on host_1 is stored in variable dumpfolder (dumpfolder_on_host_1)
#
# etl_server is the host variable in file ~/.ssh/config of host_0
# Example ~/.ssh/config:
# host etl_server
# hostname host_1
# user bob
# IdentityFile ~/.ssh/id_rsa
In the next step, the script determines the number of configured PostgreSQL nodes by executing the Pgpool-II command:
pcp_node_count -h <host_of_pgpool> -U <db_user> -w
To execute the pcp command successfully, the ~/.pcppass file on the Pgpool-II host has to be customized:
:*:*:*:<password>
(the values of the variables hostname, port and db_user aren't specified)
The command scp copies the dump from host_1 to the configured PostgreSQL instances (hosts_2, host_3, host_4).
For the scp, the above described ~/.ssh/config is important because of the used syntax.
scp -r "<host_alias_defined_in_file>:${dumpfolder_on_host_1}" "node${i}:${dumpfolder_on_host_X}"
Because the number of nodes in the Pgpool-II cluster is known as a result of pcp_node_count command, the copy job can loop over all nodes.
In order for this to work, set the variable host in file ~/.ssh/config to node${X}, node0, node1.
After the copy of all nodes has finished, half of the nodes will be refreshed in the next step. Each node will be detached from the cluster and updated. The idea behind this procedure is to have a consistent report on non-updated data. After the first half of the nodes were refreshed, the not-yet-refreshed nodes will be deactivated and the refreshed nodes will be attached again. Then the other half of the nodes will be updated. The weak point in this process is that during the refresh, not all nodes are available and this could lead to a performance bottleneck. To reduce the effect on the end user, the update of the cluster must be done when the number of report execution is low, i.e. overnight or over the weekend.
First, the PostgreSQL node will be detached from Pgpool-II by executing
pcp_detach_node -n <node_id> -h <host_of_pgpool> -U <db_user> -w
then the import_PG.sh script is starting on the remote hosts via SSH.
Keep in mind that <node_id> is the node id shown by the command show pool_nodes; and will be configured in the file /usr/local/etc/pgpool.conf.
To do the import using pg_restore, the configuration of file ~/.pgpass on the PostgreSQL servers should be as follows:
*:*:<database>:<db_user>:<password>
(hostname and port are not specified)
These steps will be repeated iteratively, i.e., the number of active nodes will be reduced step by step. When the dumps have been imported into half of the cluster nodes the detached nodes, will be attached again.
pcp_attach_node -n <node_id> -h <host_of_pgpool> -U <db_user> -w
After the refreshed nodes are enabled, all unrefreshed nodes will be detached in one step and refreshed. After the refresh has finished, the nodes will be activated again. The advantage of this process is the scalability. If an additional node will be added to the cluster or a node will be removed from the cluster no changes in the refresh process have to be implemented, because the number of configured nodes will be determined by the script and all steps will be done iteratively.
Summary
All in all, it can be said that we have achieved our goal. We were able to set up a system that can automatically transfer the changes on a backend database to a database cluster managed with pgpool. By using the pcp commands of Pgpool-II, a scripted automated process flow can be implemented with a variable number of nodes.
The title image was published by Janosch Diggelmann under the Unsplash License.
Share via


